| |
|
Introduction |
Scene 1: LightingAdding Some LightingAs a default, 3D Studio MAX puts either one or two lights in your scene automatically. This is the light currently illuminating objects in the viewports. But you can place lights anywhere you want. Tip: To set up the default lighting, go to Customize > Viewport Configuration> Render Method tab > Rendering Options area > Default Lighting. In this step, you add a spotlight and two omni lights to brighten the scene. A spotlight has a direction and target. An omni light shines in all directions uniformly. When rendered, only the lighting effect appears, not the light object you see in the viewports. In practice, designers and animators often use many lights to achieve an overall pleasing effect.
Setting up1. To start from this point, do one of the following: · Continue from the previous step, or open your saved file, work.max. 2. Zoom out in the Top viewport so there is space around the objects in the viewport.
Fig 01. Top viewport 3. Right-click in the Perspective viewport to activate it. You can see lighting effects better with the home grid turned off in this viewport. Press G to toggle off the grid.
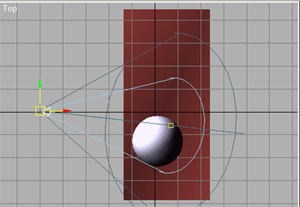
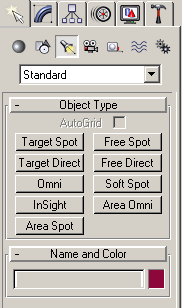
Creating a main spotlight1. On the Lights & Cameras tab of the tab panel, click Target Spot. 2. In the Top viewport, create a spotlight pointed toward the sphere. Click in the lower-right corner to set the location of the light's bulb. Drag to the orange and set the target near the center of the orange. Click to set the light's target. If you make a mistake or want to try again, press CTRL+Z to undo.
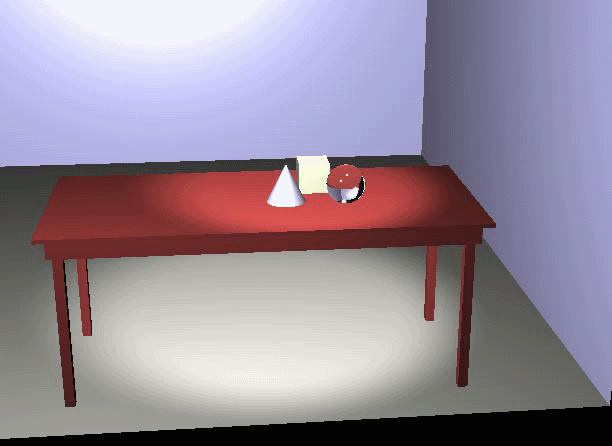
Fig 02. Spotlight pointed toward the sphere A blue line connects the light and its target. A blue cone shows the extent of the light, which is much like a flashlight. Its default name is Spot01. When you add a light, the default lighting goes away. The scene is now lit by only this one spotlight. You see the effect in the Perspective viewport. However you may add as many light sources as you like as was shown on the picture below
Fig 03. Light sources 3. Zoom out in the Left viewport until it approximately matches the Top viewport. 4. On the Main Toolbar, click Move. In the Left viewport, move Spot01 upward to the top of the viewport. Watch the lighting change in the Perspective viewport.
Creating fill-in lightsNow you add two omni fill lights in your scene, one from below and behind and one from above and in front. 1. On the Lights & Cameras tab of the tab panel, click Omni Light. 2. In the top-right corner of the Top viewport, click once to create an omni light, named Omni01. 3. Click in the lower-left corner to create Omni02. 4. Using Move, adjust the position of the both lights until you get the best lighting effect in the Perspective viewport. In the left viewport Move Omni1 down and Omni2 up, observing the changes in the perspective viewport. The omni lights seem too bright for the scene. 5. Select Omni02. 6. In the Modify panel > General Parameters rollout, set the Multiplier field to 0.5. 7. Repeat for Omni01. Now the lighting is a bit softer.
Casting a spotlight shadow1. On the Main Toolbar, click Select By Name to display the Select Objects dialog. Tip: The keyboard shortcut H opens the Select Objects dialog wherever you are in the program. This is the most accurate way to select objects in 3D Studio MAX. By default, all objects in the scene are displayed by name. In a complex scene, selecting objects with a mouse might be nearly impossible. Selecting by name ensures that you're making the correct selection. 2. In the Select Object dialog, highlight Spot01, and then click Select at the bottom of the dialog. 3. Right-click the spotlight in the active viewport. Turn on Cast Shadows from the right-click menu. You won't see shadows in the viewport. You need to render the scene. 4. Click in the Perspective viewport to make it active, if it isn't already. 5. Press F9 to render. The still life is beginning to look somewhat real.
SummaryNow we will look at the alternative ways to describe the same thing from the different point of view and in more practical way. When our objects are aligned we may now turn to applying the lighting techniques for the scene that we have crated there are number of objects to be lighted in these scene. This will be described in this section. Now lets turn to the action. Select still same options tab and select light button from there as is depicted on the picture below:
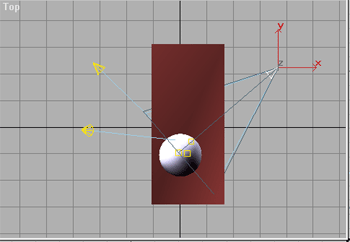
Fig 04. Light Lets take a closer look at the light sources position location and relocation of them. One should notice also that all light sources are marked in yellow and the cameras are in blue. So as you can distinguish from the picture below the location of both.
Fig 05. Camera
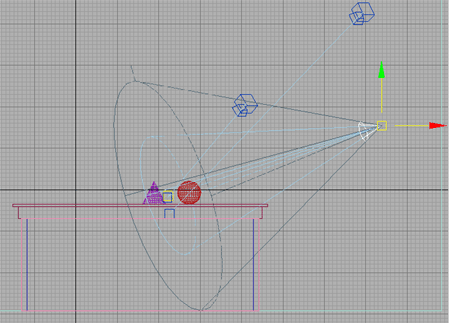
Steps:1. There is then a target spot on the surface of the object that we desire to enlighten it, 2. Then we simply drag starting from that object and relocate the light source wherever we want to, to achieve the desired effect. It is the same with cameras their location can be easily altered in any direction in 3d.
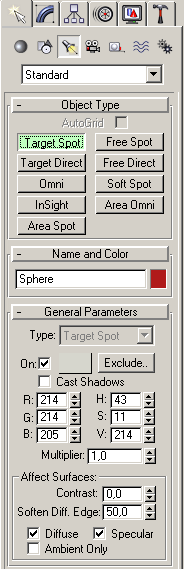
Steps:1. In general start by selecting the target spot and general parameters 2. Then study attentively all the options existing. They will not be presented all in this tutorial since it is just a beginners basic tutorial.
Fig 06. Light options Pay special attention and try applying cast shadow on the object it helps understanding. Then notice that the light can have a specific color you can specify in RGB components. In lighting we are taking care of the light sources namely their direction in the 3d space it is important to choose the right angle for the light so as to lighten the whole scene good enough. Usually we take advantage of few lighting sources to produce needed effect. Light can be directed either from the XYZ planes or from the perspective view.
Fig 07. Rendered image We place the light source by choosing the lighting tab which has the following sign on it:
Fig 08. Light source after that we are ready to place and modify our light source position and light intensity. Besides the light spreading the area covered by the light source indicated in yellow color can easily alter the area affected. We can place the lighting source outside of the room we have created in the proceeding steps.
Scene 1: LightingWhen our objects are aligned we may now turn to applying the lighting techniques for the scene that we have crated there are number of objects to be lighted in these scene. This will be described in this section. Now lets turn to the action. Select still same options tab and select light button from there as is depicted on the picture below:
Fig 09. Light source Lets take a closer look at the light sources position location and relocation of them. One should notice also that all light sources are marked in yellow and the cameras are in blue. So as you can distinguish from the picture below the location of both.
Fig 10. Camera
Steps:1. There is then a target spot on the surface of the object that we desire to enlighten it, 2. Then we simply drag starting from that object and relocate the light source wherever we want to, to achieve the desired effect. It is the same with cameras their location can be easily altered in any direction in 3d.
Steps:1. In general start by selecting the target spot and general parameters2. Then study attentively all the options existing. They will not be presented all in this tutorial since it is just a beginners basic tutorial.
Fig 11. Target spot Pay special attention and try applying cast shadow on the object it helps understanding. Then notice that the light can have a specific color you can specify in RGB components. In lighting we are taking care of the light sources namely their direction in the 3d space it is important to choose the right angle for the light so as to lighten the whole scene good enough. Usually we take advantage of few lighting sources to produce needed effect. Light can be directed either from the XYZ planes or from the perspective view. |
|
| |